Centrally configuring and deploying using VMware Airwatch
Adding/deploying the application
-
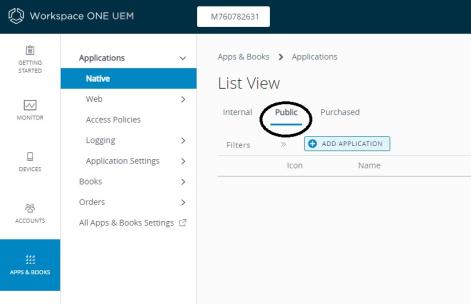
Login to your Workspace ONE UEM (VMware airwatch) interface and choose Apps and Books. Select Public and choose Add application.
-
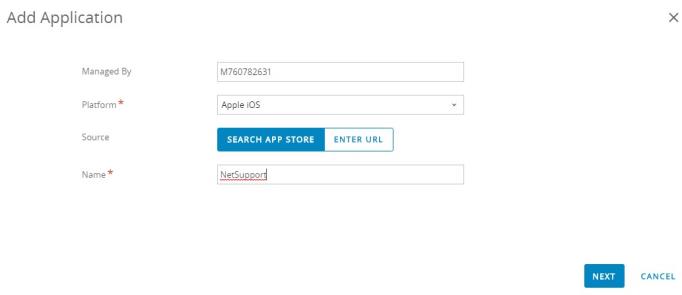
Select Apple iOS as the platform. Leave the Search App Store option selected and enter the app name, NetSupport Browser. Click Next.
-
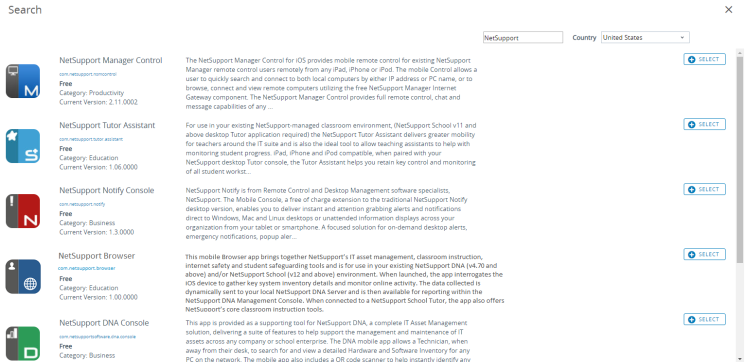
Select NetSupport Browser from the list of displayed NetSupport apps.
-
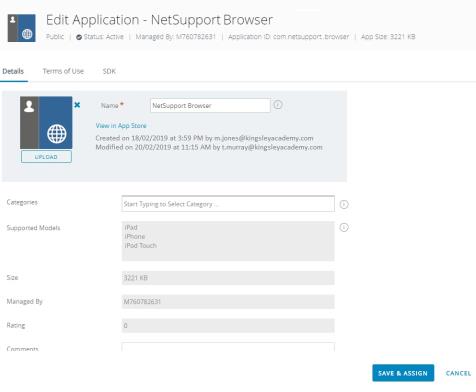
When the selected app loads, configure the required options and select Save and Assign.
-
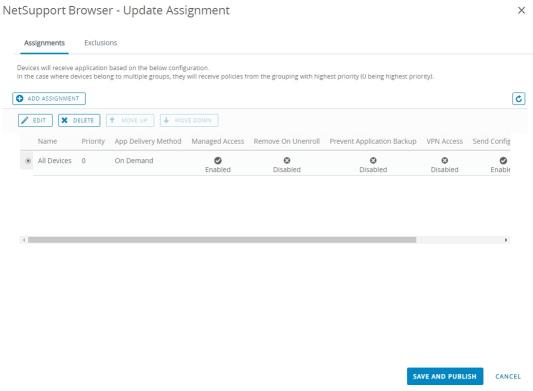
Add an assignment using the Add Assignment button or select from the list of existing assignments if already displayed. Complete the settings as required and ensure Applications Configuration is set to Enabled. A form loads allowing you to enter the app’s required configuration settings. Enter the required options to confirm how the app connects to your central DNA Server and/or NetSupport School Tutor. (A list of available NetSupport settings follows below.) Click Add.

Available NetSupport DNA settings:
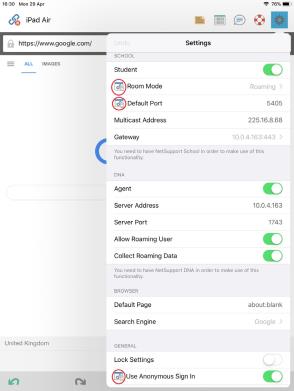
Setting Key Value type Example value Notes Enable/disable NetSupport DNA com.nsl.dna.agent.enabled Boolean True/False Enables or disables NetSupport DNA functionality. Server address com.nsl.dna.server.address Text 10.20.0.123 Sets the NetSupport DNA Server IP address. Server port com.nsl.dna.server.port Text 1743 Sets the NetSupport DNA port number. Allow roaming user com.nsl.dna.roaming.user. allowed Boolean True/False Enables or disables login to the app when not connected to the NetSupport DNA Server/off-site. Collect roaming data com.nsl.dna.roaming.data. collect Boolean True/False The app will continue to collect browser data when not connected to the NetSupport DNA Server/ off-site. Use password authentication com.nsl.dna.authentication. password Boolean True/False For use in non Active Directory environments where users do not have a username/password login. Available NetSupport School settings:
Setting Key Value type Example value Notes Enable/disable NetSupport School com.nsl.nss.student. enabled Boolean True/False Enables or disables NetSupport School functionality. Fixed room name com.nsl.nss.room. name Text Maths Locks room mode to a fixed room name. List of rooms com.nsl.nss.room. list Text Maths, English, Science Comma separated room names as a selectable list. Port com.nsl.nss.port Text 5405 Sets port number for NetSupport School connections. Multicast address com.nsl.nss. multicast.address Text 225.16.8.68 Sets the multicast address for NetSupport School. Gateway address com.nsl.nss. gateway.address Text 10.20.0.123 NetSupport Connectivity Server IP address. Gateway port com.nsl.nss. gateway.port Text 443 NetSupport Connectivity Server port number. Gateway key com.nsl.nss. gateway.key Text Password Enter the NetSupport Connectivity Server key/ password. Use Gateway com.nsl.nss. gateway.enabled Boolean True/False Enables or disables the NetSupport Connectivity Server component. General settings:
Setting Key Value type Example value Notes Default URL com.nsl.browser. defaulturl String Valid URL address Set the default web page for the browser. Auto sign-out com.nsl.session. timeout Number 0 = Never
2 = 2 minutes
5 = 5 minutes
10 = 10 minutes
15 = 15 minutes
30 = 30 minutes
60 = 60 minutes
Other number values will be rounded to nearest highest value. Remember login username com.nsl.login.user. remember Boolean True/False Set the app to remember the login credentials. Use anonymous sign in com.nsl.login.user. anonymous Boolean True/False Allow users to sign in without domain credentials. -
Confirm the devices to be included in the scope of the deployment and click Save and Publish followed by Publish. The NetSupport Browser app should now be installed on the selected devices along with the specified NetSupport configuration settings.
Conclusion
By following the steps above, the NetSupport Browser app should now be installed on the required iOS devices and configured to connect to your central NetSupport DNA Server and/or NetSupport School Tutor installation.
On the iOS devices themselves, the app settings will confirm, where applicable, that the app’s configuration has been ‘locked-down’ by a central policy and can’t be edited by users.
If you need to re-deploy the app or a configured profile you can do so by selecting, Apps & Books and selecting the app you want to edit. Select the app followed by Assign or Delete. Deleting the app will uninstall it from the assigned devices.
You can also block access to other apps, for example the App Store, and prevent users from uninstalling the app.
See also:
Centrally configuring and deploying using Cisco Meraki