Transferring files
NetSupport School includes File Transfer functionality that enables you to transfer files from the Tutor to the Students.
![]()
Tutor Console window
To send files from a Tutor to Students
-
Select the File Transfer
 icon on the left-hand side of the Tutor.
 -
The File Transfer view will appear and any existing files will be listed.
Note: To add a new file to this view, open the required file in the appropriate application, select Share with or Send file and choose NetSupport School Tutor from the list. Or you can transfer the file to the following location using a computer via USB:Android/data/com.netsupportsoftware.school.tutor/files/
The file will appear in the File Transfer view.
-
Select the files you wish to send. Selecting the Select all
 icons will select all the files. Selecting the Deselect all
  icon will deselect all the files.
 -
Select Send on the toolbar.
-
Choose the Students to send the files to and select the Send
 icon.
icon. -
A screen will appear showing the progress of the file transfer.
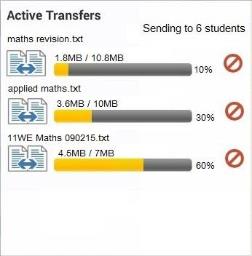
You can stop an individual file from being sent by selecting the Cancel
 icon.
icon. -
The files will be sent to the selected Students.
To view a file
-
Highlight the file that you wish to view.
-
Select the View icon on the toolbar.
-
You will be provided with a list of applications. Select the required one to view the file.
To rename a file
-
Highlight the file that you wish to rename.
-
Select the Rename icon on the toolbar.
-
Enter the new name for the file.
-
Select the Confirm
 icon to confirm the change.
To delete a file
-
Highlight the file that you wish to delete.
-
Select the Delete icon on the toolbar.
See also:
