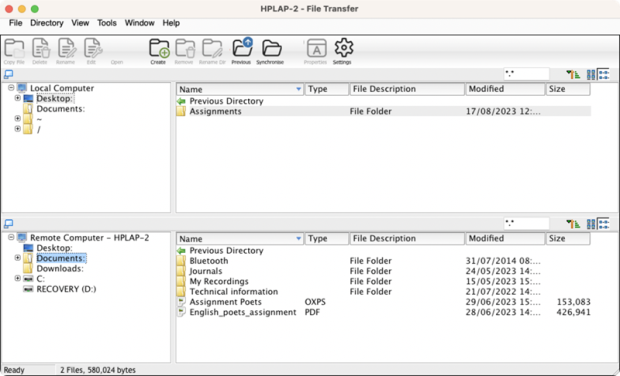
The File Transfer window
When you choose an individual File Transfer operation the File Transfer window is displayed. At its simplest you transfer files by dragging them from one location to another.

File Transfer window
The File Transfer window is divided in to six areas:
The Title bar
This shows which Student this particular File Transfer window is working with.
The Menu bar
The menu bar contains a series of drop-down menus that can be used to access the various tools and configuration utilities.
The Toolbar
The toolbar contains shortcuts to many of the most frequently used tasks and tools. Clicking on an individual item takes you straight to that task or function, eliminating the need to work through the drop-down menus. Positioning the cursor over an icon will display a brief description of its function.
The Local Pane
The local pane displays a Tree view of the directories of the Tutor on the left-hand side, and a List view![]() Displays the currently connected Students or groups. You can switch the display mode between large icons and details view from the View tab in the ribbon. of the contents of those directories on the right-hand side.
Displays the currently connected Students or groups. You can switch the display mode between large icons and details view from the View tab in the ribbon. of the contents of those directories on the right-hand side.
The Remote Pane
The remote pane displays a Tree view of the directories of the Student on the left-hand side and a List view of the contents of those directories on the right-hand side.
The Status bar
The Status bar is displayed at the bottom of the File Transfer window. It shows the current status of the Tutor and the number and size of files.
You can hide or display the Status bar from the View menu options on the Tutor Console drop-down menu bar.
See also:
