Custom setup
Select the component(s) to install on the machine.
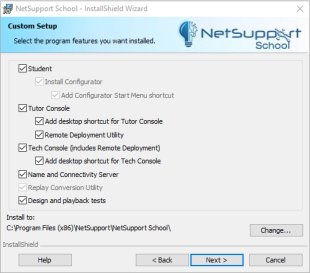
Custom Setup dialog
Student
Install this component (the Client) on machines/devices that will be remote controlled. By installing this component, you are enabling a Tutor machine to establish a link with the Student. The range of features available to students is limited to those that enable them to communicate with the teacher: for example, sending a help request.
Install Configurator: The NetSupport School Student Configurator is used to customise the Student setup at each machine. For example, setting the transport to be used, allocating a Student name and setting security.
When you choose the Student component, you will also be given the option of installing the Student Configurator.
Clear this checkbox if you do not want to install the component; you can still configure the Student machine by running the Student Configurator at a later stage of this installation.
Add Configurator Start menu Shortcut: Choose whether to create a Start Menu shortcut to the Student Configurator at the Student machine. The advantage of installing this at the Student machine is that it is easier to make changes to the settings in the future. The disadvantage is that the Students themselves could access the option and make changes.
Tutor Console
This component (the Control) should be installed on machines which will be used to remote control other PCs. It gives teachers access to NetSupport School's full range of features: for example, viewing student screens and showing their screen to students.
Selecting this component will also install a Portable Tutor![]() Run the Tutor from a portable device such as a USB Pen Drive, Memory Stick or Flash Drive. folder. This allows you to run the Tutor from a portable device such as USB Pen Drive, Memory Stick or Flash Drive.
Run the Tutor from a portable device such as a USB Pen Drive, Memory Stick or Flash Drive. folder. This allows you to run the Tutor from a portable device such as USB Pen Drive, Memory Stick or Flash Drive.
For further information, please visit our Knowledge Base and refer to product article: Running the NetSupport School Tutor from a portable device.
Add Desktop Shortcut for Tutor: Choose whether to create a desktop icon for the Control (Tutor) to enable easy access to the Tutor program.
Remote Deployment Utility: The Remote Deploy Utility enables you to perform multiple NetSupport School installations without the need to visit each individual machine.
Tech Console (includes Remote Deployment Utility)
This component should be installed on machines that will be managing and maintaining computers. It provides network managers with the main NetSupport School features.
Selecting this component will also install a Portable Tech Console folder. This allows you to run the Tech Console![]() A unique console specifically for technicians, providing a single view of all machines across the school. from a portable device such as USB Pen Drive, Memory Stick or Flash Drive.
A unique console specifically for technicians, providing a single view of all machines across the school. from a portable device such as USB Pen Drive, Memory Stick or Flash Drive.
Add Desktop Shortcut for the Tech Console: Choose whether to create a desktop icon to enable easy access to the Tech Console program.
Name and Connectivity Server
This provides a simple and reliable method of locating and connecting to Student PCs.
The NetSupport Connectivity Server
 The NetSupport Connectivity Server (Gateway) is a component in NetSupport School which provides a stable and secure method for connecting Students and Tutors via the internet using HTTP and delivers web-based remote control without the need for modifications to existing firewall configurations. is only supported on Windows 7 and above or Windows Server 2008r2 and above.
Replay Conversion Utility
This utility allows you to convert replay files to video files.
Design and Playback Tests
Installs the NetSupport School 'Test Designer' component allowing you to create and run customised tests, exams and quizzes including text, picture, audio and video questions.
Install to:
By default, NetSupport School will be installed in the folder C:\Program Files\NetSupport\NetSupport School. If you want to install in a different folder, click Change.
Click Next.
