Tech Console
A classroom management solution is not simply about providing the right tools for each teacher; equally important are tools to ensure all computers in the school can be managed and maintained, so they are always available for teaching. With this in mind, NetSupport School also provides a unique "Tech Console![]() A unique console specifically for technicians, providing a single view of all machines across the school." specifically for technicians.
A unique console specifically for technicians, providing a single view of all machines across the school." specifically for technicians.
The Tech Console provides a single view of all computers across the school, allowing technicians to review hardware and software inventory, monitor internet and application usage, apply 'always on' internet, application and printing policies and define security policies which all PCs across the school will be checked against to determine whether they are secure.
To start the Tech Console, click the NetSupport School Tech Console icon in the Start screen or click the desktop icon, if the option was selected during installation.
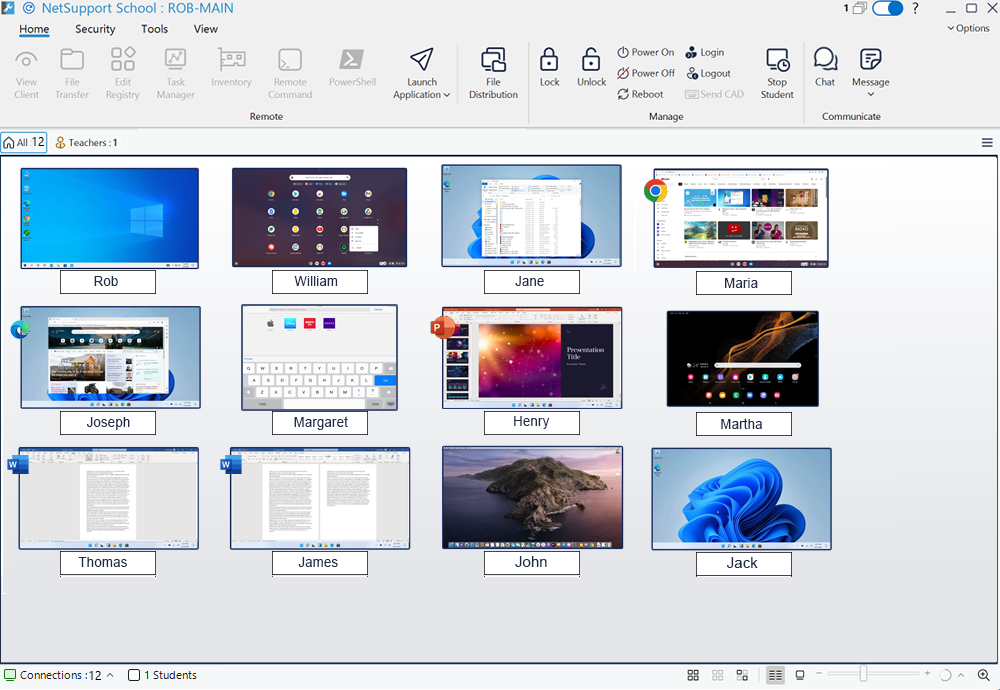
Tech Console window
When the Tech Console loads for the first time, the Configuration dialog appears. This enables you to specify the Students to connect to at start-up. This dialog will not appear in future sessions but can be accessed by clicking Options on the right-hand side of the Tech Console and selecting Settings from the drop-down menu.
In the List view![]() Displays the currently connected Students or groups. You can switch the display mode between large icons and details view from the View tab in the ribbon., the connected Students can be viewed in two different ways. Thumbnail view displays a thumbnail of the Student screen, providing a quick and easy method for monitoring activity. Details view displays details of the Student machines, such as name, IP address, user name, Client platform, Client version, current security state, policy settings, room, running application and all websites.
Displays the currently connected Students or groups. You can switch the display mode between large icons and details view from the View tab in the ribbon., the connected Students can be viewed in two different ways. Thumbnail view displays a thumbnail of the Student screen, providing a quick and easy method for monitoring activity. Details view displays details of the Student machines, such as name, IP address, user name, Client platform, Client version, current security state, policy settings, room, running application and all websites.
The icon displayed next to the Student name in details view will change depending on the status of the Student. The available icons are:
Grey PC = the machine is off.
Colour PC = the machine on, no Tutor connected.
Green user = the Tutor is connected (Student is in a class).
Brown user = the Student is a teacher.
To toggle between views, select the View tab in the ribbon and click Details or Thumbnail, or click the Details ![]() or Thumbnail
or Thumbnail ![]() icon on the status bar.
icon on the status bar.
If you are in details view, you can hide the Running Applications, All Websites and Client Version columns by clearing the required checkboxes in the View tab of the ribbon.
From the status bar, you can resize the Student thumbnails using a convenient 'slider' bar, change the thumbnail refresh rate and automatically adjust the size of the displayed thumbnails to fit the window.
To allow you to differentiate between a Student and a Tutor, a Tutor ![]() icon is displayed next to the Tutor thumbnail. A connection bar showing the link from the Tutor to the Students is also displayed. You can manually set a machine to show as a Tutor machine; right-click the required Student and click the Properties
icon is displayed next to the Tutor thumbnail. A connection bar showing the link from the Tutor to the Students is also displayed. You can manually set a machine to show as a Tutor machine; right-click the required Student and click the Properties ![]() icon. In the General tab, select This is a teacher's computer.
icon. In the General tab, select This is a teacher's computer.
With the Tech Console, you can:
-
Monitor all computers across the school network in a single view.
-
Monitor application and internet usage on each Student PC.
-
Transfer files and folders to selected or all computers.
-
Group all computers by classroom/physical location.
-
Perform a hardware/software inventory.
-
Use the Task Manager to view and manage applications, processes and services on the Student.
-
Provide direct technical assistance to any classroom teacher.
-
Power on/off classroom computers remotely.
-
Reboot/logout classroom computers remotely.
-
Automatically login computers.
-
Display all Students and Tutors by active class.
-
Review individual NetSupport School Student security settings remotely.
-
Conduct Chat with one or multiple Students or Tutors.
-
Broadcast messages to groups or all network users in seconds.
-
Perform powerful 1:1 PC Remote Control on any selected computer.
-
See real-time USB memory stick status on all Student PCs.
-
Launch applications on Student PCs.
-
View/set power management, Windows update and security settings.
-
Edit the registry of a remote and local system.
-
Launch a local command prompt from the remote system on your PC.
-
Launch a PowerShell window at the selected Student.
-
Automatically connect to Students/Tutors using Room mode.
-
Apply a school-wide set of internet, application, USB, CD/DVD and print restrictions.
-
Easily find Student and Tutor machines using the search feature.
-
Stop the NetSupport School Student running at the student machine.
-
Create user-defined tools that can automatically run a task on a Tech Console machine.
-
Manage files on a Tech Console using the File Manager.
NetSupport School allows teachers to request help from technicians. The Teacher Support![]() Enables teachers to request support from a technician. When the Tutor Console is connected to the Tech Console a Support icon appears on the caption bar. feature is enabled by default and can be turned on and off by toggling the Teacher Support
Enables teachers to request support from a technician. When the Tutor Console is connected to the Tech Console a Support icon appears on the caption bar. feature is enabled by default and can be turned on and off by toggling the Teacher Support ![]() toggle on the caption bar. A Support
toggle on the caption bar. A Support ![]() icon is displayed on the Tutor Console caption bar. Clicking the icon allows the Tutor to either chat or send a message directly to the technician.
icon is displayed on the Tutor Console caption bar. Clicking the icon allows the Tutor to either chat or send a message directly to the technician.
See also:
