Sending a message to Students
With NetSupport School CCE, you can send a message to all connected Students or the currently selected Students. If you send the same message on a regular basis, you can store up to five pre-defined messages.
To enter and send a new message
-
Select the Students you want to send the message to.
-
Select the Class tab on the ribbon and click Message.
Or
Right-click and choose Message.
Or
To send a message to a group, select the Group tab on the ribbon (ensure the required group is selected) or click the drop-down icon on the required group tab (hover over the right-hand side of the Group tab to display it) and click Message.
-
The Send Message dialog appears.
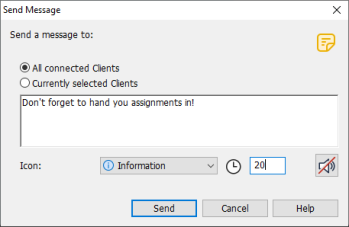
 icon.Note: If a Student Journal has been started, you can add the message to it.
 -
Click Send. The message appears at the selected students' devices and remains until the user closes the dialog or the specified time limit expires.
To send a pre-defined message
-
Select the required Student icons.
-
Select the Class tab in the ribbon and click the Message icon drop-down arrow.
Or
Right-click and select the Message icon drop-down arrow.
-
The pre-defined messages are displayed. Click on the required message to send it to Students.
To send a quick message to all Students
-
Select the Class tab in the ribbon and click the Message icon drop-down arrow.
-
Enter the message in the Quick Message field and click the Message
 icon.
icon. -
The message is sent to all connected Students.
To send a message while viewing
-
In the View window, select the Home tab in the ribbon and click Message.
-
The Send Message to Client dialog appears.
-
Enter the message. Decide whether to show it at the Student's machine for a specified time. If a Student Journal has been started, you can add the message to this.
-
Click Send.
-
The message is displayed on the Student screen currently being viewed.
See also: