Easy mode
NetSupport School provides three modes for viewing the user interface: advanced, intermediate and easy. Advanced mode provides full access to all of NetSupport School's features and functions. Intermediate mode provides access to the primary features and frequently used functions. Easy mode provides access to a focused set of classroom management features needed to maintain control over a class.
Using easy mode
-
Start the NetSupport School Tutor Console.
-
Click the Easy Mode
 icon.
icon. -
Enter the required details in the Class wizard, choose the class to connect to and click OK.
-
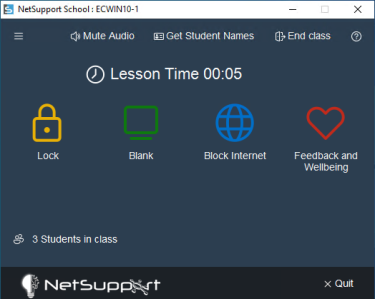
The Tutor Console appears in easy mode.
-
From here, you can see the number of Students in your class, the time the lesson has been running (you can pause the time by clicking on it) and the available feature icons (the icon changes if the feature is active).
-
The user interface can be minimised by clicking the Menu
 icon and selecting Minimized Interface. When minimised, it will remain on top of any other open windows. Note: Double-clicking in the window switches between minimised and maximised mode.
 -
You can change the theme/colour of the user interface by clicking the Menu
 icon, selecting Theme and choosing the required theme from the list.
 -
Click Power On to power on Student machines. You can request the Student names by clicking Get Student Names. To mute audio at all Students, click Mute Audio.
Note: The Power On icon only appears if there are Student machines that need to be powered on. -
A notification appears in the window if a Student has requested help. Clicking this opens the Help Request window, allowing you to respond to the Student.
-
To end the class and start a new one, click End Class. Click Quit to exit the Tutor Console.
The available features in easy mode are:
-
Mute audio at Students
-
Lesson timer
-
See Student help requests
-
Get Student names.
See also:
