Class wizard
The Class wizard enables you to enter the general properties of a new lesson and allows you to choose how to locate and connect to your Students. You can create multiple classes using different connection methods. The required class can then be loaded at the start of the lesson and you can quickly connect to Student machines.
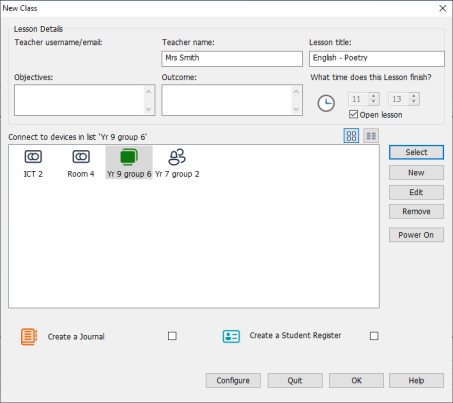
New Class dialog
Lesson Details
You have the option to input the teacher name, lesson title, lesson objectives and outcomes. If these details are completed, they will form part of the Student Register and be displayed in the Student Toolbar.
What time does this lesson finish?: Enter the time you want the class to finish; a timer will appear while the lesson is in progress. If you do not want the lesson to be timed, enable the Open Lesson option.
Connect to
Select the method to locate and connect to Students.
Click New to create a connection method for your class. The Select Startup Mode dialog appears: you can connect by room,
When the connection method for your class has been defined, it appears in the Class wizard and is available for selection. Double click the required class or highlight the class and click Select.
Once the connection list is populated with the required class(es), you can click the Large Icon and Details View buttons to switch view mode.
To modify an existing class, select the required class and click Edit. The dialog relating to the method of connection will appear, allowing you to modify the details.
To delete a class, select the required class and click Remove.
Power On: Turns on all computers when connecting by Room or PC names.
Ad-hoc room: From here, you can enter an ad-hoc room to connect to. This option will only be displayed if the Prompt at startup option has been selected in the Tutor Configuration - Student Selection settings.
Create a Journal
Allows you to start or open an existing Journal.
Create a Student Register
Before the lesson starts, you can prompt the Students to login with their names. These will be displayed at the Tutor instead of the machine names.
Don't show this dialog again
Turn on if you don't want the Class wizard to appear at startup.
Configure
Provides access to a selection of Tutor configuration settings that allow you to set network settings, such as, enabling the NetSupport Connectivity Server![]() The NetSupport Connectivity Server (Gateway) is a component in NetSupport School which provides a stable and secure method for connecting Students and Tutors via the internet using HTTP and delivers web-based remote control without the need for modifications to existing firewall configurations. and choosing which connection method to use.
The NetSupport Connectivity Server (Gateway) is a component in NetSupport School which provides a stable and secure method for connecting Students and Tutors via the internet using HTTP and delivers web-based remote control without the need for modifications to existing firewall configurations. and choosing which connection method to use.
Click OK to start the lesson. The Tutor will now browse and connect to Students using the selected connection mode. If you have asked for Students to register their names, the Student Register dialog will appear.
