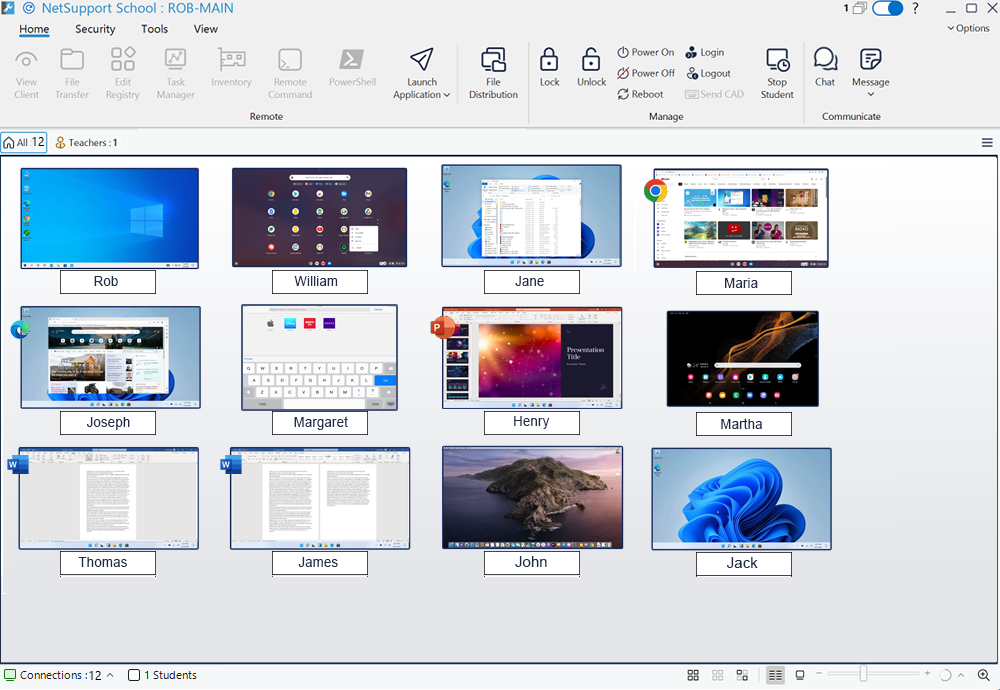
The Tech Console window
The Tech Console![]() A unique console specifically for technicians, providing a single view of all machines across the school. window is the main interface for technicians to manage and maintain computers across the network.
A unique console specifically for technicians, providing a single view of all machines across the school. window is the main interface for technicians to manage and maintain computers across the network.
Tech Console window
The Tech Console window is divided into the following sections:
The caption bar
This indicates that you are in the Tech Console window and displays the name of the Tech Console machine. The following options are available on the right-hand side:
|
[Refresh Students icon] |
Refresh the list of Students. |
|
[Multiple windows icon] |
Shows how many windows are open. From here, you can access the Window menu. |
|
[Toggle teacher support icon - blue toggle] |
Toggle on or off teacher support. |
|
[Online help icon - question mark] |
Access the online help and version number, licensee, Technical Support and compression information. |
|
[Minimise window icon] |
Minimise the window. |
|
[Maximise window icon] |
Maximise the window. |
|
[Close window icon] |
Close the window. |
Options
From here, you can access the settings for the Tech Console; modify the Student list; access the help file, version number, licence and Technical Support information; and access any Tech Console updates (Options is highlighted if there is an update available).
The ribbon
The ribbon provides access to all the features and tools. Positioning the cursor over an icon will display a brief description of its function. The ribbon is organised into the following tabs:
Home: Provides access to the remote, manage and communicate functions of the Tech Console.
Group: Provides access to the group functions within the Tech Console.
Security: Allows you to define what a secure state for a PC is, modify security settings for Students and create and manage school-wide restrictions.
Tools: Provides access to the File Manager and Edit Registry tools for the Tech Console machine. You can also create user-defined tools that automatically run a task on a Tech Console machine.
View: Select how the Students are displayed in the List view![]() Displays the currently connected Students or groups. You can switch the display mode between large icons and details view from the View tab in the ribbon. and what options to display. You can also search for Students here.
Displays the currently connected Students or groups. You can switch the display mode between large icons and details view from the View tab in the ribbon. and what options to display. You can also search for Students here.
The group bar
Until you have defined groups of Students, only the 'All' group will appear. Click the Group options ![]() icon and select Add to add a new group. Once defined, the group name along with the number of members appears. You can automatically add groups of all teachers or Student rooms (these groups are pre-defined and can't be changed) by selecting the View tab in the ribbon and clicking Group by Room or Group Teachers.
icon and select Add to add a new group. Once defined, the group name along with the number of members appears. You can automatically add groups of all teachers or Student rooms (these groups are pre-defined and can't be changed) by selecting the View tab in the ribbon and clicking Group by Room or Group Teachers.
With the required group selected, you can change properties such as the displayed name and icon image by clicking the Group options ![]() icon selecting Properties. Select the General tab to change the group name and click Customise to select a different image for the group. Select the Members tab to change the members of the group.
icon selecting Properties. Select the General tab to change the group name and click Customise to select a different image for the group. Select the Members tab to change the members of the group.
Clicking the right-hand side of a group tab displays a drop-down menu, allowing you to access commonly used features.
To disable the group bar, select the View tab in the ribbon and clear the Group Bar option.
The List view
The List view displays the currently connected Students or groups. You can switch the display between details and thumbnail view from the View tab in the ribbon or by clicking the Details ![]() or Thumbnail
or Thumbnail ![]() icon on the status bar.
icon on the status bar.
The status bar
The status bar is displayed at the bottom of the Tech Console window. It shows the number of currently connected Students. You can see a list of all connected Students by clicking Connections.
From the status bar, you can resize the Student thumbnails using a convenient 'slider' bar, change the thumbnail refresh rate and automatically adjust the size of the displayed thumbnails to fit the window.

