Policy management
The Tech Console![]() A unique console specifically for technicians, providing a single view of all machines across the school. allows you to create a set of policy restrictions that can be applied across the whole school permanently. Once the policy is applied, it will remain in force 24 hours a day. The policy restrictions can include internet and application usage, access to USB and CD/DVD drives, printing and webcams.
A unique console specifically for technicians, providing a single view of all machines across the school. allows you to create a set of policy restrictions that can be applied across the whole school permanently. Once the policy is applied, it will remain in force 24 hours a day. The policy restrictions can include internet and application usage, access to USB and CD/DVD drives, printing and webcams.
In details view, you can view the current policy restrictions for Students. Hovering over the icons in the Policy column displays further information about the current policy.
The NetSupport School Tutor is notified of any policy restrictions that are in force. A lock icon will be displayed next to the relevant feature advising that a central policy has been applied.
Creating a policy
-
Select the Security tab in the ribbon and click Group.
Or
Click the Details
 icon on the status bar, right-click in the Policy column and select Policy Management.
 -
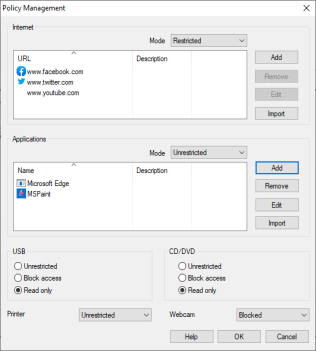
The Policy Management dialog appears.
-
Set the required restrictions.
-
Click OK.
-
Click Yes to apply the policy changes to all Students.
Applying a policy
You can apply the policy to all connected machines.
-
Select the Security tab in the ribbon and click Apply.
Clear a policy
Clears the current policy from the selected Student(s).
-
Click the Details
icon on the status bar. -
Select the required Student(s).
-
Right-click in the Policy column and select Clear Policy.
See also:
