Transferring files
NetSupport School includes sophisticated File Transfer functionality that enables you to transfer files to and from a Tutor and Student machine.
File Transfer functionality can be configured by clicking Options in the Tutor Console, selecting Settings from the drop-down menu and choosing File Transfer.
To transfer files and folders between a Tutor and a Student
-
Select the required Student in the List view
 Displays the currently connected Students or groups. You can switch the display mode between large icons and details view from the View tab in the ribbon..
 -
Select the Class tab in the ribbon and click File Transfer.
Or
Right-click the Student and choose File Transfer.
Or
If you are viewing the Student, select the Tools tab in the View window and click the File Transfer icon.
-
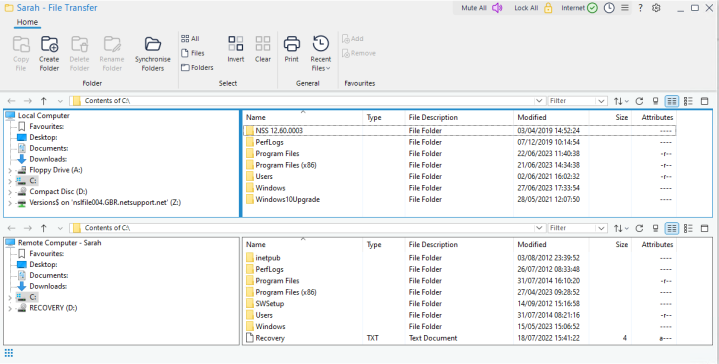
The File Transfer window to that Student opens.
-
From the local or remote pane, select the destination drive or folder into which the items will be copied.
Note: The path to any open folders (Explorer windows) on the Student desktop is displayed at the top of the remote pane to enable quick selection. -
From the local or remote List view, select the item(s) to be copied to the Student. To select all files, click the Files icon on the ribbon. To select all folders, click the Folders icon. If you want to transfer all files and folders, click the All icon.
Note: NetSupport School provides a list of files the Tutor has recently worked with that can be sent to a Student. Click Recent Files (the last 20 files are displayed) and select a file from the list. The file will be copied to the current folder at the Student. -
Click Copy File.
Note: The selected item(s) can also be 'dragged' from the List view and 'dropped' into the destination drive or folder. -
A confirmation dialog will be displayed. Click Yes.
-
The Copy Progress dialog will appear, showing the progress. From here, you can choose to ignore any error messages and overwrite prompts until completion. These will then be displayed in a summary window at the end of the operation.
To transfer files between Students
It is also possible to copy files and folders between two Students.
-
Display the File Transfer window for each Student.
-
Arrange the File Transfer windows so you can see both Students and simply drag files/folders from one to the other.
See also:
