Distributing files
As well as enabling you to transfer files to and from individual Student's, NetSupport School also allows you to distribute files to multiple Students simultaneously.
To improve performance when distributing files, NetSupport School's Broadcast File Distribution facility is enabled by default. This results in the files being sent to all machines simultaneously, thus improving the speed of transfer. If this feature is turned off, the files are sent to each Student machine in turn.
Whilst reducing overall network traffic generated by NetSupport School, using this feature will generate additional broadcast packets on your network. It is recommended that you consult your network administrator before using this feature.
File Distribution can be sent to Students using multicast. The broadcast will only be sent to machines included in the specified IP multicast address.
To distribute files to Students
-
Select the Group tab in the ribbon and click File Distribution.
Note: To distribute files to a group, select the required group from the group bar. -
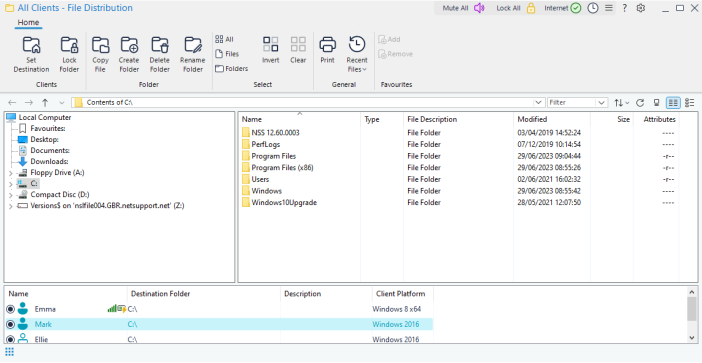
The File Distribution window appears.

-
In the remote pane, indicate which Students you wish to copy files to (remove the check mark next to the Student to exclude them).
-
From the Tree view, select the item(s) to be copied to the Students. To select all files, click the Files icon on the ribbon. To select all folders, click the Folders icon. If you want to transfer all files and folders, click the All icon.
Note: NetSupport School provides a list of files that the Tutor has recently worked with which can be sent to a Student. Click Recent Files (the last 20 files are displayed) and select a file from the list. The file will be copied to the current folder at the Student. -
The location on the Student machines where the files/folders are copied to is called the destination folder. Unless otherwise specified, the Student destination folder will be the same as the item(s) located on the Tutor machine. If the Student does not have the same folder available, the item(s) will be copied to the C drive by default and the folder automatically created.
Or
To set a specific destination folder on the Student machine, right-click the Student icon in the remote pane and choose Set Destination. Specify a destination and click OK.
Note: To set the destination folder for all Students, click the Set Destination icon on the ribbon. You can lock the destination folder at Students by clicking Lock Folder. -
Click Copy File.
-
A confirmation dialog is displayed. Click Yes.
-
A Copy Progress dialog appears, showing the progress of the transfer. You can choose to ignore error messages and overwrite prompts until the operation is completed.
See also:
