Monitor mode
Monitor mode enables the Tutor to view multiple Student screens simultaneously. A convenient thumbnail view of each connected Student screen is displayed at the Tutor, providing a quick and easy method for monitoring Student activity.
-
Click the Monitor View
 icon on the left-hand side of the Tutor Console.
Or
Select the View tab in the ribbon, click the drop-down arrow
 in the Mode section and choose Monitor View.
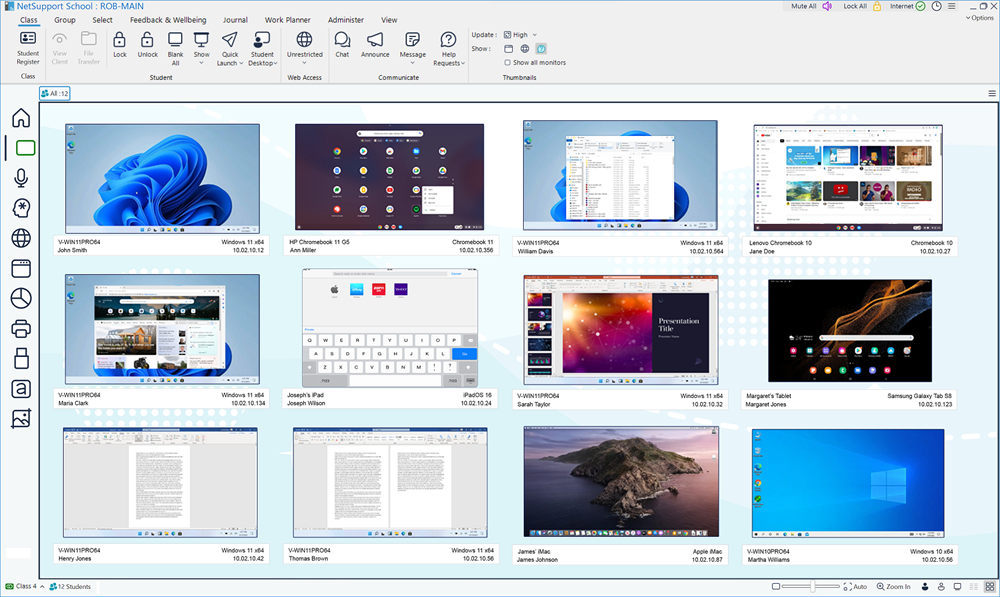
The List view![]() Displays the currently connected Students or groups. You can switch the display mode between large icons and details view from the View tab in the ribbon. will display each Student thumbnail. By mousing over a thumbnail, you can zoom into that screen. Double-clicking on a thumbnail will open a View session to the Student, right-click and you can select from a range of available Student features. For example, by selecting multiple thumbnails, you can invite those Students into a Chat session.
Displays the currently connected Students or groups. You can switch the display mode between large icons and details view from the View tab in the ribbon. will display each Student thumbnail. By mousing over a thumbnail, you can zoom into that screen. Double-clicking on a thumbnail will open a View session to the Student, right-click and you can select from a range of available Student features. For example, by selecting multiple thumbnails, you can invite those Students into a Chat session.
When viewing a 'zoomed' thumbnail, you can:
-
lock the Student by clicking the Lock
 icon
icon -
open a View window by clicking the View
 icon
icon -
capture a snapshot of the thumbnail by clicking the Capture Screenshot
 icon. (The screenshot is saved as a .png to NetSupport School\Screenshots in your local Documents folder. You are notified if there is an error taking a screenshot).
-
The zoom facility can be toggled on/off by clicking Zoom In on the status bar.
-
By default, the battery level and wireless strength (if applicable) are displayed on the Student thumbnails. You can turn these off in the Tutor Configurator - Tutor User Interface settings.
Customise thumbnail size
Student thumbnails can be resized to suit personal preferences. This is particularly useful when connected to large numbers of Student machines.
-
Use the slider on the status bar to select the required size.
Auto-fit size of student thumbnail
This option will automatically adjust the size of the displayed thumbnails to fit the window.
-
Click Auto on the status bar.
Changing the thumbnail refresh rate
Depending on how closely you want to monitor Student activity, you can adjust the frequency at which the thumbnails are refreshed. By default, this is set to high.
-
Select the Class tab in the ribbon and select the required option (real-time, high, medium or low) from the Update drop-down list.
Show active application
When enabled, an icon will appear in the top left of each thumbnail indicating which application is currently active at the Student machine.
-
Select the Class tab in the ribbon and click the Show current application
 icon.
icon.
Show active website
Displays an icon in the top right of each thumbnail indicating which site the Student is currently visiting.
-
Select the Class tab in the ribbon and click the Show current website
 icon.
icon.
Show help requests
This option highlights when a Student has outstanding help requests (it is enabled by default). The Student thumbnail is highlighted to show when a Student requests help (the colour matches the type of alert selected; green for work is complete, amber for help needed and red for urgent help required).
-
Select the Class tab in the ribbon and click the Show Students help requests
 icon.
icon.
Multiple monitors
If a Student is running multiple monitors, icons are displayed on their thumbnail, allowing you to switch between each monitor or view the whole desktop. Click the Multi Monitor Menu ![]() icon to view the whole desktop or select which monitor to view. Click the Whole Desktop
icon to view the whole desktop or select which monitor to view. Click the Whole Desktop ![]() icon to view the whole desktop. Click the Number
icon to view the whole desktop. Click the Number ![]() icon to view an individual monitor.
icon to view an individual monitor.
See also:
