Remotely launching applications and websites at Students
This feature allows you to launch (execute) applications and websites on an individual Student machine or a group of Student machines without the need to remote control them. For example, after showing Students how to use an application, you might want to launch it on their machines.
Launch an application or website at a Student from the Tutor Console
-
Select the required Student in the List view
 Displays the currently connected Students or groups. You can switch the display mode between large icons and details view from the View tab in the ribbon..
 -
Select the Class tab in the ribbon and click Quick Launch.
-
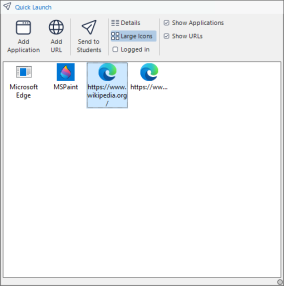
The Quick Launch pane appears.
-
Click Add Application or Add URL.
-
If adding an application, enter the name and path of the application to launch at the Student.
Or
Click Browse and select an executable application on the Tutor machine.
Notes:
-
When adding applications on Windows machines that have the Microsoft Store, two tabs will be displayed in the Application Properties dialog. The Desktop Application tab allows you to add standard Windows applications as detailed above. The Windows Store Application tab lists Windows Store applications.
-
Check that Student applications are stored in the same location as the Tutor to ensure successful execution.
-
If you want to launch a specific file with the application, you must separate the two instructions with quotes. For example, "C:\Program Files\Microsoft Office\Excel.exe" "C:\My Documents\Accounts.xls".
-
-
Click OK.
-
If adding a website, enter the URL and click OK.
-
The application or website icon is displayed in the Quick Launch pane and saved for future use.
Notes:
-
If you only want to launch applications or websites to Students who are logged on, select the Logged in option.
-
You can choose to display just applications or websites by clicking the Show Applications or Show URLs option.
-
-
Select the required application or website and click Send to Students.
Launch an application at a Student from the Tech Console
-
Select the required Student in the List view.
-
Select the Home tab in the ribbon and click Launch Application.
Or
Right-click the Student and choose Launch Application.
-
The Execute Application at Client dialog appears.
-
Select the Execute tab.
-
Enter the name and path of the application to launch at the Student.
OrClick Local Browse to browse for the application on the Tech Console
A unique console specifically for technicians, providing a single view of all machines across the school. machine.Note: Check that Student applications are stored in the same location to ensure successful execution. -
Select Add to List to save the application for future use in the Saved List tab. Confirm the description and path.
Note: The application is added to the Launch Application drop-down list in the ribbon. -
If you only want to launch the application to Students that are logged on, select Execute only if the Client is logged on.
-
If you don't want to view the result of the operation, click No result required.
-
Click Execute.
-
The application will now be launched at the selected Student and if applicable, the result of the operation is displayed in the Results pane.
Or
-
If you have saved a list of applications, you can select the required application from the Launch Application drop-down list.
-
Click Client must be logged on to launch the application at Students that are logged on and if you don't want to see the results of the operation, click No result required.
-
The application will be launched at the Student and the Execute Application at Client dialog appears, displaying any results.
Launch an application on a Student machine whilst viewing
A list of applications can be saved in the View window, allowing you to quickly launch these at a Student.
-
Select the Home tab in the View window ribbon.
-
Click Add.
-
Enter the name and path of the application.
Or
Click the Folder
 icon to browse for the application on the Tutor machine.
 -
Click OK.
-
The application will be listed in the Quick Launch pane.
Note: Click Manage to edit or remove a listed application. -
You can now launch the application at the Student. Select the application in the list and click Launch or double-click the application.
-
The application will run at the Student.
See also:
Launch an application on a group of Students
Remove a saved application or website
Edit a saved application or website
