Student Journal
NetSupport School provides a Journal feature, allowing key lesson resources to be captured and automatically included in a PDF file for post-lesson review by each student and as a record of content covered for teachers. Not only can teachers add notes and resources used during the lesson directly to each Student Journal, the Students can add their own notes making this a truly personalised document.
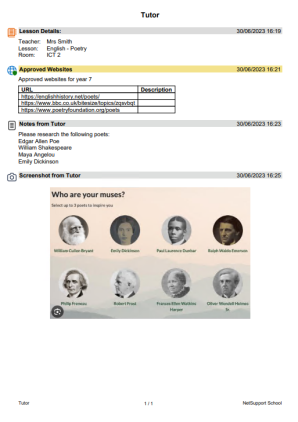
Example Student Journal
By default, the Journal is located in:
C:\Users\"Logged on User"\Documents\Journals
Configuring the Journal
You can customise the settings for the Journal (at both the Student and Tutor) and change the location of where the Journal is stored.
Tutor Journal
-
Click Options in the Tutor Console, select Settings from the drop-down menu and choose Journal.
Student Journal
-
In the Student Configurator, select Journal.
Items that can be included within the Journal are:
-
Lesson details and objectives
-
Student register
-
The Approved Websites list
-
Copies of any class chat transcripts
-
Class or group survey results
-
Individual Student test results
-
Virtual whiteboard screens
-
Screenshots (and supporting explanation)
-
Target keywords
-
Teacher notes
-
Individual Student notes.
-
Student rewards
 The Tutor can 'reward' Students for good behaviour..
 -
Student stickers
Send animated stickers to Students recognising students' good behaviour..
-
Students' web history can be automatically saved to the Tutor Journal when the Tutor Console is shut down. To enable this setting, click Options in the Tutor Console, select Settings from the drop-down menu, choose User Interface - Tutor and select the Save Student Web history to Tutor Journal option.
-
Student rewards and stickers are automatically added to the Journal when they are given to Students.
Starting a Journal
The Journal will automatically start when any of the 'Send to Journal' options are selected. You can also start a Journal in the Class wizard.
-
Select the Journal tab in the ribbon and click Start.
Add Tutor notes to the Journal
-
Select the required Students in the List view
Displays the currently connected Students or groups. You can switch the display mode between large icons and details view from the View tab in the ribbon.. -
Select the Journal tab in the ribbon and click Notes.
-
The Add Notes to Journal dialog appears.
-
Enter the required note and choose which Student Journals to send the note to from the Send To drop-down list (all connected Students or the currently selected Students).
-
Click OK.
Add a screenshot to the Journal
-
Select the required Students in the List view.
-
Select the Journal tab in the ribbon and click Screenshot.
-
Click Desktop to add a screenshot of your desktop.
-
Click Application and select the required application from the list to add a screenshot of the selected application.
-
Click Paste to add an image you have copied to your clipboard.
-
You can enter a note to accompany the screenshot if required.
-
Choose which Student Journals to send the screenshot to from the Send To drop-down list (all connected Students or the currently selected Students).
-
Click OK.
Add Student notes or screenshots to the Journal
Students can add their own notes and screenshots to their Journal.
-
Click the Journal
 icon on the Student Toolbar and select Add notes to Journal.
Or
Right-click the NetSupport School Student icon on the system tray and select Add Notes to Journal.
Or
Click the NetSupport School Student icon on the system tray and choose {Commands}{Add Notes to Journal} from the drop-down menu.
-
Enter the required note and/or screenshot, following steps 3-5 above.
-
Click OK.
-
The note and/or image will be added to the Student Journal.
Add the student register to the Journal
The student register can be added to the Tutor's Journal.
-
Select the Journal tab in the ribbon and click Student Register.
Or
Select the Class tab in the ribbon, click the Student Register icon and choose Student Register.
Add the Approved Websites list to the Journal
-
Select the required Students in the List view.
-
Select the Journal tab in the ribbon and click Websites.
-
Enter a note if required, and choose whether to send to all connected or the currently selected Students.
-
Click OK.
Add the target word list to the Journal
You can add a target word list to the Journal.
-
Select the required Students in the List view.
-
Select the Journal tab in the ribbon and click Word List.
-
Enter a note if required and choose whether to send to all or the currently selected Students.
Note: If you haven't already created a word list in Keyboard Monitoring, you are prompted to add the target words. Click OK. -
Click OK.
Add the survey results to the Journal
If you have conducted a Student survey, you can add the results to the Journal.
-
Select the Journal tab in the ribbon and click Survey.
-
A message will appear advising that the results have been added.
-
Click OK.
Add the contents of the interactive whiteboard to the Journal
-
Select the Journal tab in the ribbon and click Whiteboard.
Note: This option is only active if the whiteboard is being shown to Students. -
Enter a note to be added with the whiteboard image if required.
-
Click OK.
Add a chapter to the Journal
Chapters can be added, allowing the Journal to be organised into sections. Each chapter starts on a new page.
-
Select the Journal tab in the ribbon.
-
In the Chapter section, enter a name for the chapter and click Add.
-
Items are now added to the new chapter.
Remove an item from the Journal
You can remove the last item added to the Journal.
-
At the Tutor, select the Journal tab in the ribbon and click Undo last add.
Or
-
At the Student, right-click the NetSupport School Student icon on the system tray and select Delete Last Journal Item.
Or
Click the NetSupport School Student icon on the system tray and choose {Commands}{Delete Last Journal Item} from the drop-down menu.
View a Journal
-
Select the Journal tab in the ribbon and click View Journal.
Print the Journal
You can print a copy of the current Journal.
-
Select the Journal tab in the ribbon and click Print.
Synchronise Journals
You can synchronise the Tutor Journal with the Students to ensure the Student Journals are up-to-date. Any missing items are added to the Student Journals. This will not affect any information that the Student has added.
-
Select the Journal tab in the ribbon and click Synchronise.
End the current Journal
-
Select the Journal tab in the ribbon and click Stop.
See also:
