Lesson planner
A NetSupport School lesson plan enables a Tutor to structure a session around a pre-defined set of tasks with appropriate timings and prompts allocated to each part of the plan.
Common NetSupport School functionality can be built into the plan, such as run test, send/collect work, scan and show.
To create a lesson plan
-
Select the Work Planner tab in the ribbon and click Manage Plans.
Or
If displayed, click the Show the Lesson Planner
 icon on the Lesson Plan bar.
 -
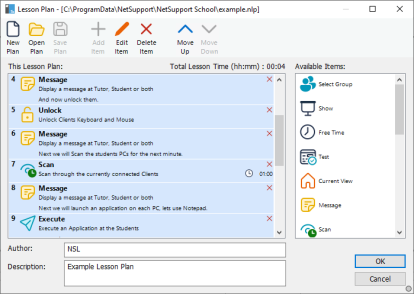
The Lesson Plan window appears.
-
To create a new lesson plan, click New Plan on the toolbar
-
From the Available Items list, drag the required task and drop it into the This Lesson Plan pane. Enter any additional properties that are required. You can edit and move tasks in the lesson plan using the appropriate icons on the toolbar.
-
If required, enter the lesson plan's author and description.
-
Click Save Plan and enter a name for the plan.
-
Click Save.
-
The Lesson Plan window displays the lesson content, total time, author and description of the lesson.
-
To start the currently loaded lesson, click OK and then Yes or click Cancel to close the window.
Running a lesson plan
-
Select the Work Planner tab in the ribbon and click Execute Plan.
-
Select the required lesson plan and click Open.
-
A cut-down version of the Lesson Plan window appears, showing the tasks included in the plan.
Note: You cannot edit the tasks in a lesson plan from here. -
Click OK.
Managing a lesson plan
When a lesson plan is activated, a progress bar appears in the lesson plan bar. You are prompted before each task is due to begin and can choose whether to continue or abort. At any point during a task, you can use the tools in the ribbon or on the lesson plan bar to pause, skip to the next item or abort the lesson.
Lesson timer
You can have a timed session without running a pre-defined lesson plan.
-
Students running pre-version 15.00 won't show the lesson timer.
-
You can also set the time that the lesson ends in the Class wizard.
-
Select the Work Planner tab in the ribbon and click Set Class Time.
-
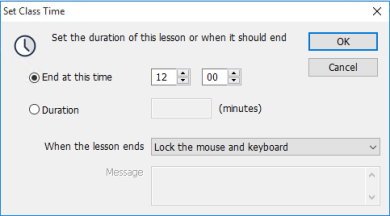
The Set Class Time dialog appears.
-
Select the end time for the class or enter a duration.
-
Decide what happens when the lesson ends. You can do nothing, send a message or lock the Students' mice and keyboards.
-
Click OK.
-
A timer appears on the caption bar and the Student Toolbar.
-
Click the timer to add an extra ten minutes, pause or stop. You can also stop the timed session by clicking Remove in the Set Class Time dialog.
