Setting up an Approved or Restricted Websites list
Approved websites: When activated, Students can only view the websites specified in this list. The list of approved websites is displayed on the Student Toolbar. If this is disabled, a page is displayed at Student machines.
Restricted websites: When activated, the Student is unable to view the websites specified in this list. However, all other websites can be viewed.
-
To ensure Students are only viewing the appropriate pages in a website you can approve/restrict sub-URLs, specific web pages and have different parts of the same website approved/restricted, i.e. www.bbc.co.uk/learning can be restricted but www.bbc.co.uk/learning/history can be approved. Students will only be able to view pages relating to history and not view pages relating to Science or English.
-
Web restrictions can be applied at startup. Click Options in the Tutor Console, select Network Settings from the drop-down menu and choose Start Options - Restrictions.
Add a website to the Approved or Restricted Websites list
-
Click the Add
 icon.
icon.Or
Right-click in the Approved Websites or Restricted Websites pane and select Add Website.
-
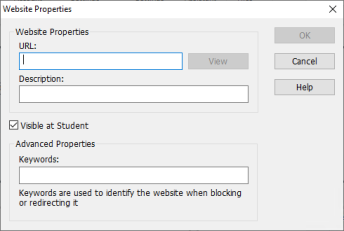
The Website Properties dialog appears.
-
Type in the website address under URL.
-
Type in the description, e.g. Google (this is optional).
Note: By default, keywords are entered to prevent/allow a Student to view a URL that includes these keywords. This can be used to deal with websites that are re-directed. -
By default, websites added to the Approved Websites list appear in the Student Toolbar. If you don't want Students to see this website, you can hide it by clearing the Visible at Student option.
-
Click OK.
-
The website and description will appear in the Approved Websites or Restricted Websites pane.
Or
-
Switch the List view
 Displays the currently connected Students or groups. You can switch the display mode between large icons and details view from the View tab in the ribbon. to details view by clicking the Details view
  icon on the status bar.
 -
Right-click on a website icon in the List view in the Current Web Site or All Web Sites column.
-
Choose Add to Approved List.
Or
Choose Add to Restricted List.
-
The Website Properties dialog appears with the website details pre-populated.
-
Click OK.
-
The website and description will appear in the Approved or Restricted Websites list.
Remove a website from the Approved or Restricted Websites list
-
Highlight the chosen website and click the Remove
 icon.
icon.Or
Right-click the website and select Remove Website.
Create a new Website list
You may need to create more than one Website list, for example, if you want different websites approved or restricted for different classes. The default Website list is saved as NetSupport School.web
-
Select the Class tab in the ribbon and from the Website list drop-down menu, click Create New Website List.
-
Enter a file name and click Create.
-
A new blank Website list will appear.
Open an existing Website list
-
Select the Class tab in the ribbon and from the Website list drop-down menu, click Load Existing Website List.
-
Highlight the relevant file and click Open.
-
The existing Website list will appear.
Save a new Website list
-
Select the Class tab in the ribbon and from the Website list drop-down menu, click Save Website List As.
-
Enter a file name and click Save.
-
The current Website list will be saved.
-
Any changes made to a new or existing Website list are automatically saved when a new Website list is created, or when you exit out of the Tutor Console.
-
The approved Website list can be added to the Student Journal by clicking the Journal
 icon above the Approved Websites pane.
See also:
Blocking/restricting internet access
