Setting up approved or restricted application lists
Approved Applications: The Student is only able to run the applications specified in this list.
Restricted Applications: The Student is unable to run the applications specified in this list.
Add an application to your Approved or Restricted Applications list
-
Click the Add
 icon.
icon.Or
Right-click in the Approved or Restricted Applications List pane and select Add Application.
Or
Drag and drop applications from your desktop or Start menu into the Approved or Restricted Applications List pane.
-
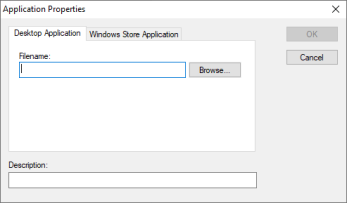
The Application Properties dialog appears.
-
Type in the .exe file name (e.g. winword.exe) under Filename or browse for your chosen application.
-
Type in the description, e.g. Microsoft Word.
Note: When adding applications on Windows machines that have the Microsoft Store, two tabs will be displayed. The Desktop Application tab allows you to add standard Windows applications as detailed above. The Windows Store Application tab lists Windows Store applications, allowing you to select the required application. -
Click OK.
-
The application icon, name and description will appear in your Approved or Restricted Applications pane.
Or
-
Switch the List view
 Displays the currently connected Students or groups. You can switch the display mode between large icons and details view from the View tab in the ribbon. to details layout by clicking the Details view
  icon on the status bar.
 -
Right-click on an application icon in the List view in the Current Application or Running Applications column.
-
Choose Add to Approved List.
Or
Choose Add to Restricted List.
-
The application icon and description will appear in the Approved or Restricted Applications pane.
Remove an application from your Approved or Restricted Applications list
-
Highlight the chosen application and click the Remove
 icon.
icon.Or
Right-click the application and select Remove Application.
Apply approved or restricted applications
Restrictions can be applied to individual Students or all connected Students. Students can view the current restrictions in the Student Toolbar.
-
If you want to apply restrictions to individual Students, select their icons in the List view.
-
To apply these restrictions, select the Class tab in the ribbon and click Approved Only or Block Restricted.
-
To acknowledge which restriction has been activated, an appropriate indicator will appear next to the Student icons. Red for restricted, green for approved.
-
If a Student is currently running an application included in your activated restriction list, an Application Blocked dialog appears on their screen, stating the application that has been blocked by the Tutor. This will also appear if a Student attempts to run any of the applications included on the restriction list.
End approved or restricted applications
-
To remove the restrictions for individual Students, select their icons in the List view.
-
Select the Class tab in the ribbon and click Allow All.
-
The green or red indicator will be removed from the selected Student icons.
Create a new application list
You may need to create more than one application list, for example, if you want different approved or restricted for different classes. The default application list is NetSupport School.app.
-
To create a new Application list, select the Class tab in the ribbon and from the Application list drop-down menu, click Create New Application List.
-
Enter a file name and click Save.
-
A new blank Application list will appear.
Open an existing application list
-
To open an existing application list, select the Class tab in the ribbon and from the Application list drop-down menu, click Load Existing Application List.
-
Highlight the relevant file and click Open.
-
The existing application list will appear.
Save an application list
-
To save the current application list, select the Class tab in the ribbon and from the Application list drop-down menu, click Save Application List As.
-
Enter a file name and click Save.
-
The current application list will be saved.
