Send work files
Two methods are available for sending pre-prepared work files to Student machines:
-
Quick send: Useful for one-off operations where you want to send work to all connected Students or a defined group of Students.
-
Advanced send: Enables you to store the properties of an operation that will be performed regularly and provides greater flexibility as to which Students the work is sent to.
To send work using quick send
-
Decide which Students to send work to, all or a defined group. You cannot select individual Students using quick send.
-
Select the Work Planner tab in the ribbon and click Send Work.
-
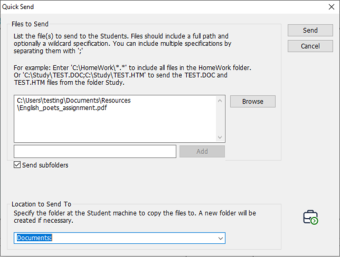
The Quick Send dialog appears.
-
List the file(s) or specify a folder to send to the Students. Files should include a full path and optionally a wildcard specification. You can include multiple specifications by separating them with ';'.
Or
Click Browse to locate the file(s).
Or
Enter the path for the file or folder in the Add field and click Add.
-
If you are sending a folder to Students, you can also send any subfolders. Click Include subfolders.
-
Specify the folder at the Student machine to copy the file(s) to. You can choose Desktop or Documents from the drop-down list. A new folder will be created if necessary.
-
Click Send.
-
The result of the operation will be displayed for you to check that the work has been sent successfully.
-
Click OK.
To send work using advanced send
-
Select the Work Planner tab in the ribbon and click Send/Collect Work.
-
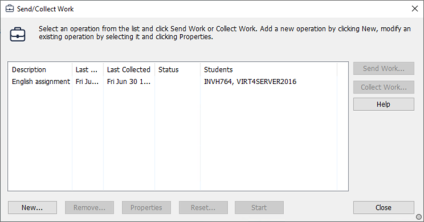
The Send/Collect Work dialog appears.
-
Existing send/collect work operations are listed.
-
To add a new operation, click New. The Send/Collect Work wizard appears. Follow the instructions in the wizard.
-
Select an operation from the list and click Send Work.
-
The Select Students dialog appears.
-
You can send work to all Students or click These Clients to select the required Students (remove the check mark next to the Student icon to remove them).
-
Click OK.
-
The result of the operation will be displayed for you to check that the work has been sent successfully.
-
Click OK.
Once work has been sent to the Students, a Send work status pane appears in the ribbon showing the current status.
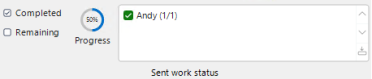
You can show Students who have completed their work or those with items remaining by clicking the appropriate option. The overall progress allows you to keep track of how many Students have completed the work.
The Students can open work items from the Student Toolbar and click when a work item is complete. This updates the status in the Send work status pane.
See also:
To change the properties of an operation
