Integrating NetSupport School with Google Classroom
NetSupport School supports integration with SIS (Student Information System) environments via OneRoster and Google Classroom, allowing teachers to access their online SIS classrooms and student accounts at the start of a NetSupport School-managed lesson. Before you can integrate with Google Classroom, you first need to set up a Google Classroom Project.
For a video tutorial, please click here.
Step 1 - Setting up a Google Classroom Project
-
Go to https://console.cloud.google.com and log in as the global admin for G Suite for Education domain.
-
From the Select a Project drop-down menu, select New Project.
Enter a project name, e.g. Chrome Town High (this must be unique to the school or school district).
Click Create.
Select your recently created project to display it in the Console dashboard.
-
In the navigation menu, select APIs & Services > Library.
Search for, and enable, the following three APIs:
-
Google Classroom (required for roster information)
-
Cloud Pub/Sub (required for class change notifications)
-
Admin SDK (required for Google Management).
-
-
In the navigation menu, select APIs & Services > Credentials.
Click OAuth consent screen.
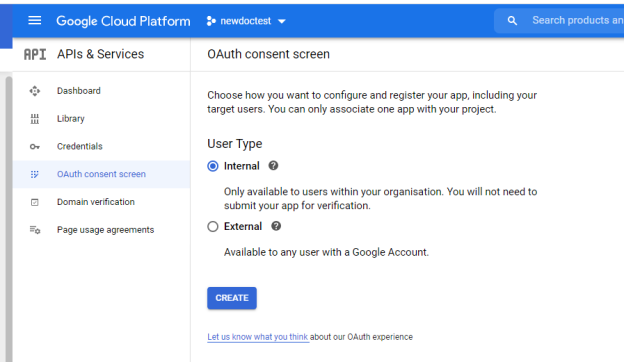
Select Internal and press Create.
Under Application Name, enter the name of the application, e.g. Chrome Town High.
Under Scopes for Google APIs, select Add Scope and locate the following three scopes:
Click Add.
Click Save.
-
Select Credentials, then Create Credentials > Service account key.
Enter a name and description, e.g. pubsubadmin. Click Create.
In Service account permissions, add the role Pub/Sub Admin.
Click Continue.
Click Done.
Select the Edit icon to edit the service account just created.
Navigate to Keys.
Select Add key > Create key.
In the dialog, select JSON and press Create. A JSON file will be saved to your downloads folder.
Note: The file created here is required for the Name & Connectivity Server. -
Select API-Credentials > Create Credentials > OAuth client ID, select Desktop app, enter a name and click Create.
The Client ID and client secret will be displayed. Click OK.
-
Click the Download
 icon to download the JSON file for the OAuth Client ID you have created, and save the JSON file so this can be copied to the Name & Connectivity Server.
 -
In the navigation menu, select IAM & admin.
On the IAM tab, click Add.
Enter the following email:
classroom-notifications@system.gserviceaccount.com
Select the suggestion.
From the Select a role drop-down list, select Pub/Sub publisher.
Click Save.
Step 2 - Configuring the Name & Connectivity Server for Google Classroom
The two JSON files created above are required to configure the Name & Connectivity Server. Copy these files and place them on the machine where the Name & Connectivity Server is installed.
-
Open the Connectivity Server Configuration utility by right-clicking the NetSupport Connectivity Server
 The NetSupport Connectivity Server (Gateway) is a component in NetSupport School which provides a stable and secure method for connecting Students and Tutors via the internet using HTTP and delivers web-based remote control without the need for modifications to existing firewall configurations.
 icon in the system tray and selecting Configure Connectivity Server.
 -
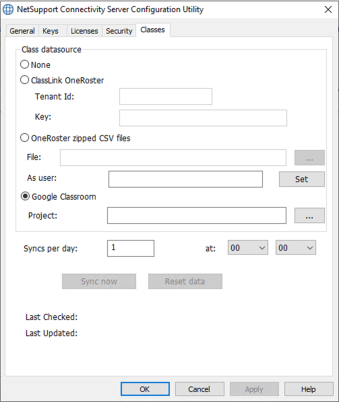
Select the Classes tab.
-
Select Google Classroom and click the Browse
 icon to browse for and select one of the JSON files that you have copied to the machine (both files must be present, but either file can be selected).
 -
Click Apply. You are prompted to sign into Google G Suite with administrator credentials and grant access to NetSupport School.
You can now use SIS mode![]() Connect to your SIS environment using ClassLink OneRoster or Google Classroom. to connect to the required students.
Connect to your SIS environment using ClassLink OneRoster or Google Classroom. to connect to the required students.
Troubleshooting
For the above to work, you may need to add the Client ID into Google Admin.
-
Go to https://console.cloud.google.com and log in as the global admin for your G Suite for Education domain.
-
Navigate to API & Services > Credentials.
Under OAuth 2.0 Client IDs, click the Copy icon next to the Client ID for your application. You will need this for the next section.

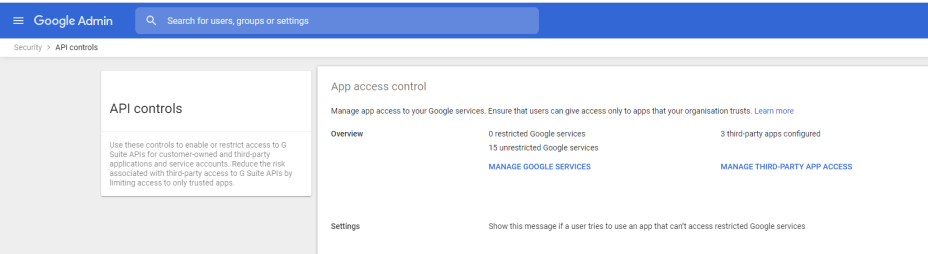
Log in to Admin.google.com with your G Suite for Education administrator account and navigate to Security > API Controls.
Select the option to Trust internal, domain owned apps.
-
Under the third-party apps configured section, click Manage Third-Party App Access.
-
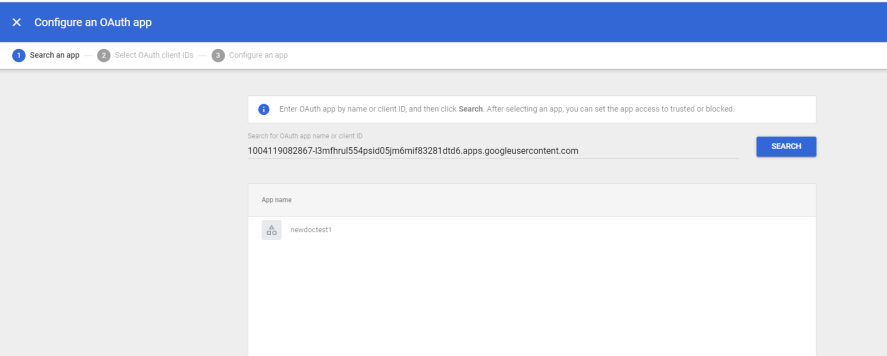
Ensure the Apps tab is visible and select Configure new app.
-
From the drop-down menu, select OAuth App Name or Client ID.
-
Paste your Client ID from the Developer Console and press Search.
-
Select the application that is returned.
-
On the next page, select the boxes and click Select.
-
On the Configure an app page, select Trusted and then press Configure.
-
Check the application now shows in the list of third-party apps.
-
Select the application and press Change access.
-
Select Limited: can only access unrestricted Google Services.
